How to install TWRP Recovery on Galaxy S8+
If you own a Galaxy S8+ and wants to install TWRP to unlock full potentials of your smartphone, then you’ve come on the right place. In this tutorial, we’re going to provide a detailed instructions that will helps you to install TWRP on Samsung Galaxy S8 plus.
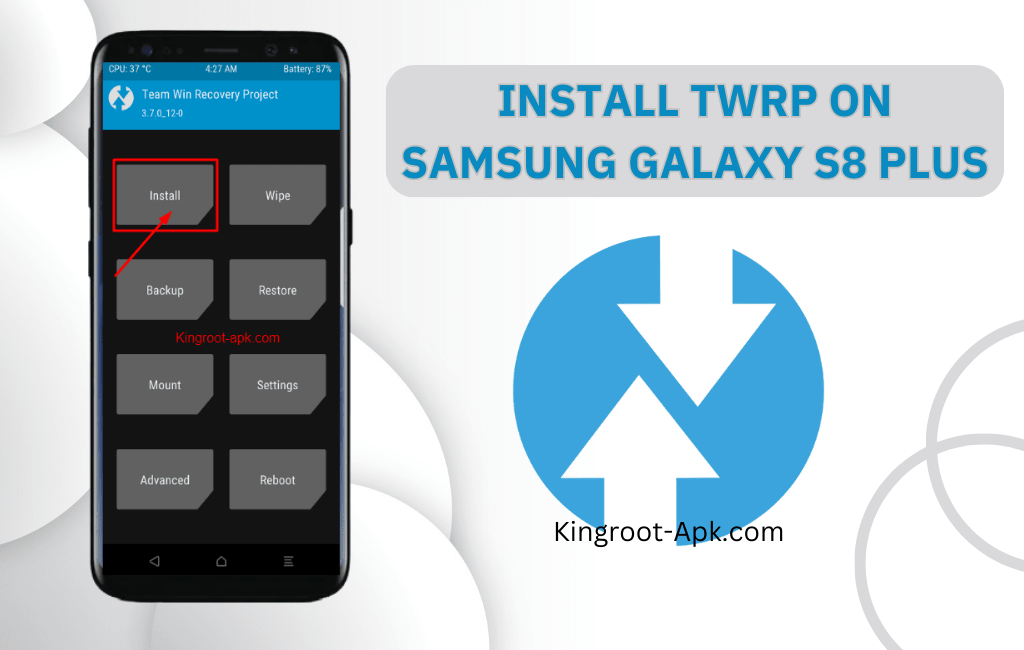
Table of Contents
What is TWRP Recovery In Android?
TWRP recovery is a popular recovery image that is used to flash third-party firmware such as custom kernels or mods, gain access to root and ADB, backup & restore Android systems, clear caches, and perform other tasks. It has a touch-screen GUI interface that allows users to take full control over their Android device.
Furthermore, TWRP stands for (Team Win Recovery Project) that allows users to modify their smartphone system level like the manufacturer. As you may know that Samsung Galaxy S8+ comes with official stock recovery with limited functions. But TWRP offers a great customization options that are not offered by default recovery.
In this guide, we’ll share simple instructions to install TWRP successfully on your Galaxy S8+. If you follow this guidance, then no matter what’s your experience level.
Benefits of Installing TWRP on Galaxy S8+
- It enables users to easily create full backups of their bootloader, operating system, data and applications.
- Users can install ROMs, custom kernels, and customizations with ease.
- You can remove pre-installed apps (bloatware) and block ads.
- It makes system file management, permission changes, cache clearing, and data deletion easier.
- It enables the installation of custom zips containing themes, tweaks, and customizations that require root or recovery access.
- You can quickly root and unroot your Samsung Galaxy S8+ without using a computer.
- It allows you to set up for overclocking and underclocking, which improves your smartphone’s performance.
Risks to install TWRP on Galaxy S8+
- TWRP installation can be a dangerous technique that can harm your phone if done incorrectly.
- Banking applications may not function properly.
Six Steps to Install TWRP on Samsung Galaxy S8 Plus
In this section, we’ll go over 6 easy steps to install TWRP. So, you can fully utilize the hidden features of your Samsung Galaxy S8+. Make sure your smartphone is read for this procedure, if not then read the following:
Preparation for Installing TWRP on Galaxy S8+
- Check that your phone is at least 50% charged.
- Make a complete backup of everything such as contacts, images, videos etc.
- Remove the Samsung account, device password or pin.
- A laptop or computer as well as a genuine USB cable are required.
Step1: Enable Developer Mode
The first step that you need to unlock bootloader of your Samsung S8 plus. Without unlocking bootloader, you can’t install TWRP. As bootloader is the special code/program that execute prior on your phone starts to run and also loads the device system software. Unlocking the bootloader gives your phone complete permission to install custom recovery. The process is quite simple, just follow the steps carefully.
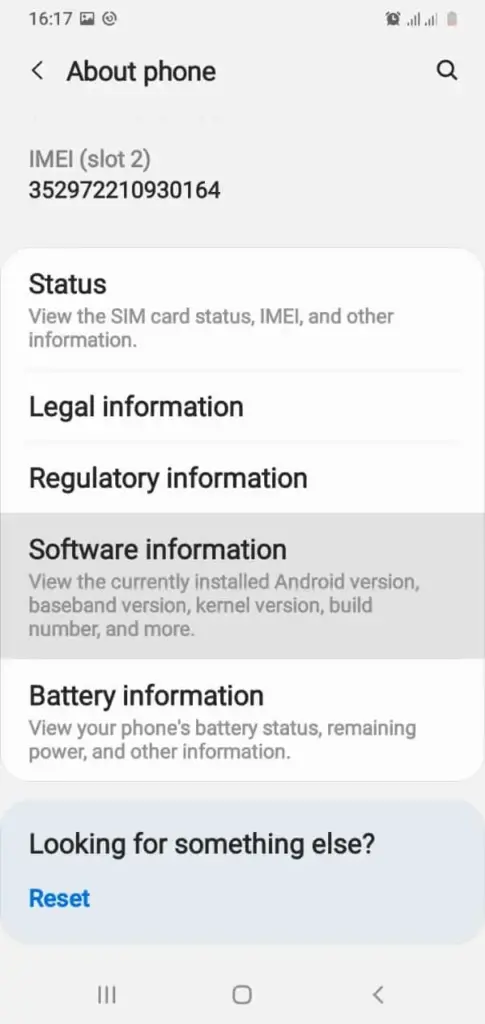
- First of all, go to the settings of your Samsung Galaxy S8+ and then scroll to bottom find “about phone” option and open.
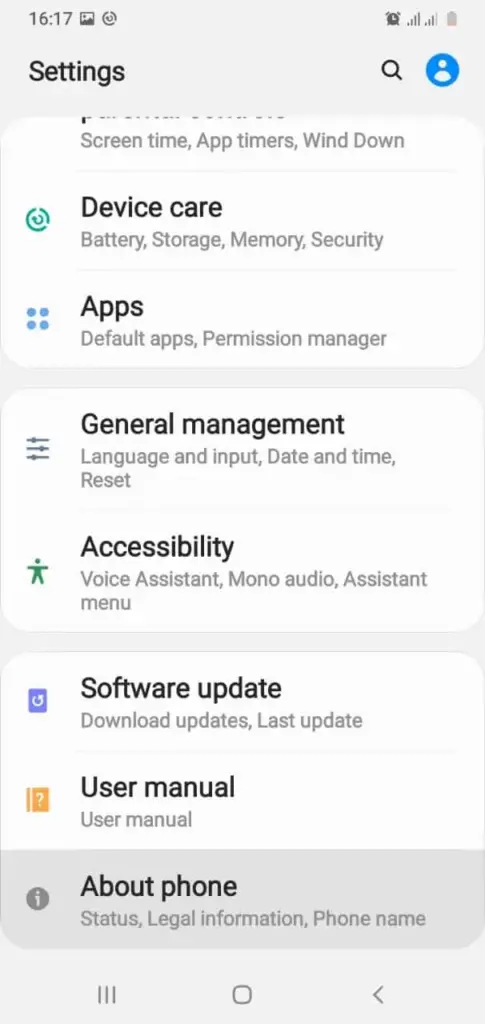
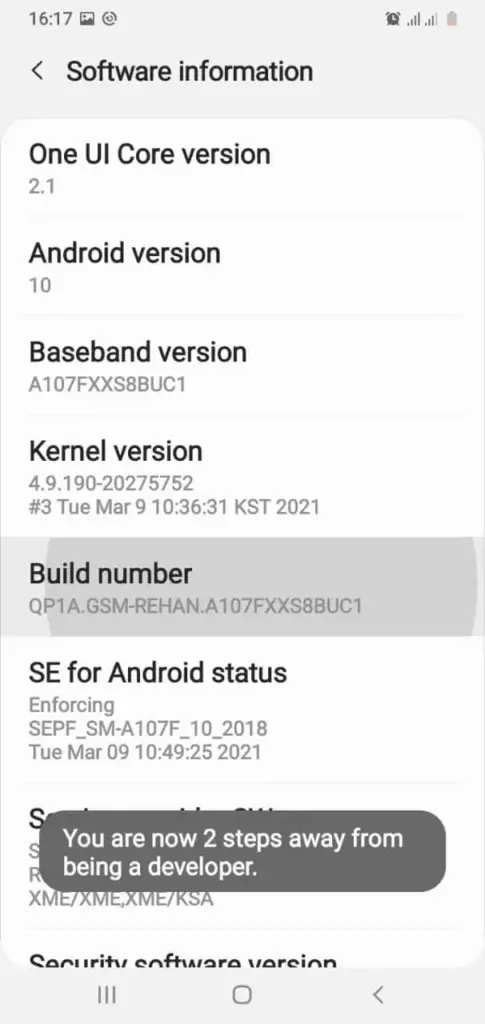
- After that and select “software information“ for to view build number.
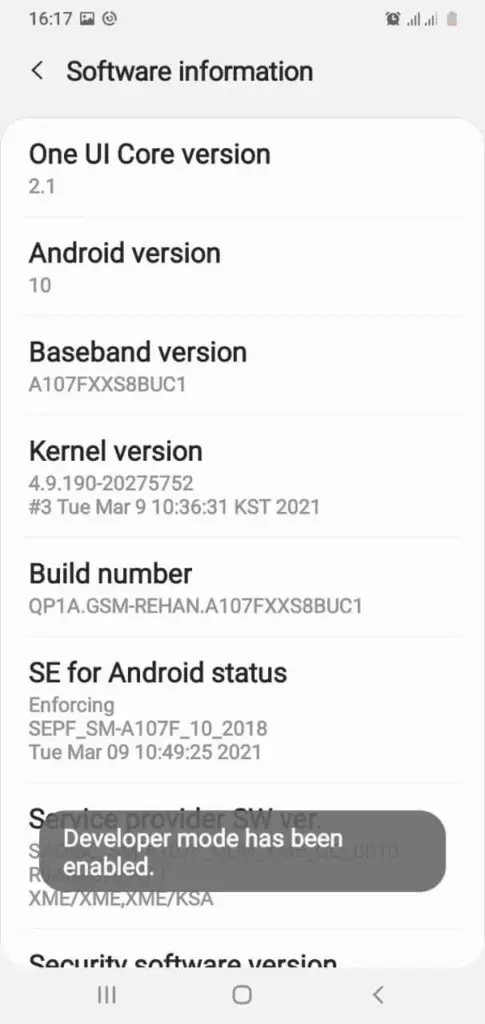
- Then tap “build number” for about seven times simultaneously until the developer mode is enable.
- You will see “developer mode” has been enabled.
Step2: Enable OEM, USB Debugging Option
- In developer options, scroll down and enable “OEM unlocking” option. Here you see bootloader already unlocked.

- After that scroll to bottom and click on “USB debugging” option. Then click ok to enable.

Note: Make sure that both option is enabled, it’s important if you want to install TWRP. If you confuse about these steps you can contact us.
Step3: Unlock Bootloader
This is necessary step, as it allows you to modify system level that your are able to customize your smartphone software. In this section, we’re going to provide basic steps to ensure that your Galaxy S8+ bootloader has unlocked or not.
- In this step, turn off your phone and connect it to a computer using a data cable. Then, keep pressing the “Power button + (Volume Up + Volume Down)” keys at the same time until you see the “Warning” screen.
- To unlock the bootloader, press and hold the “Volume Up” button for a duration longer than seven seconds. Use the volume buttons to navigate to “Yes” when asked if you want to unlock the bootloader, and then press the power button to confirm.
Step4: Downloading Odin tool and TWRP files
In this step, we’re going to download the TWRP file or Odin program in order to install TWRP on your Samsung S8 plus.
- Download Odin tool for pc use. Run it to install on your computer/laptop.
- TWRP recovery file needed to download you can visit official site. Remember that you need to find to download “.image.tor” file from here.
Download TWRP file for Galaxy S8+ (Exynos/Snapdragon)
- Once download, then move it to your computer.
Step5: Boot Samsung Galaxy S8+ into Download Mode
Moving into download mode is necessary because firmware must be flashed. It allows your smartphone for connect to computer Simply follow these steps to successfully boot your device into download mode.
- First of all, turn off your Samsung S8 plus. Once your phone goes to switch off mode then press on (bixby + volume down + power) buttons at the same time and hold all these three until you will not see warning screen.

- Now to continue you have to press “volume up” button once and again press yes. You see the downloading screen appeared which we need.
Step6: Connect & Flashing TWRP file Using Odin
our smartphone is now prepared to install TWRP after this final setup. Verify that your device is in download or recovery mode and that you have completed all previous steps. We’ll be showing a few simple steps for you to follow.
- Open Odin program on your Pc. You need to connect your phone to computer via USB cable that is generally type c. Once it connected, you see this COM as shown in image. It means that your phone has been detected.
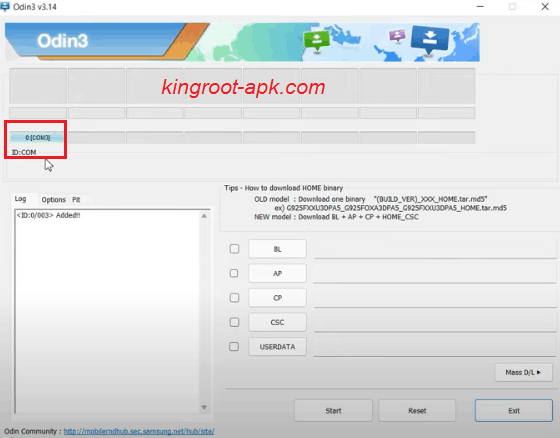
- In this step, you see all slots such as “BL, AP, CP, CSC, UserData“. You need to click on “AP” to choose TWRP tar file that you have just downloaded or move into you computer. Tap to open, it might take some time or depending on how heavy that file.
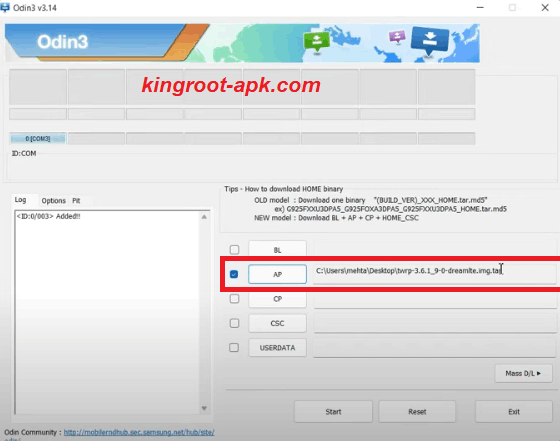
- Make sure you have disable Auto Reboot in option as shown in picture. If not then uncheck the “Auto Reboot” button.
- Click on “Start” button. It will take some time to complete.

- Once complete, you will see pass as shown in image. It means that the recovery has been successfully flashed.

- Now, you need to boot into recovery mode. Firstly get out from download mode. So, press Volume Down key and power button for 7 seconds.
- During this moment’s your Samsung Galaxy S8+ is about to boot up. So, you can start the combination of recovery by pressing (Bixby+Volum Up+Power) button quickly and holding these combinations until recovery page not open. If you fail to boot it on time then you phone will boot up. You can try again right after switch off your device.

- Once recovery page open. You can swipe to allow system modification.
How to Root Samsung Galaxy S8 Plus?
TWRP recovery helps you to install root on your Samsung Galaxy S8+ and gain more administrative access to the operating system of your smartphone. Rooting gives you the ability to install new apps, edit system files, and remove manufacturer restrictions. We recommend reading our guide on how to root an Android phone if you want to root your smartphone. It will give you a comprehensive understanding of roots.
Read more: How to root Samsung Galaxy S8 Plus?
Final Words
Following the above instructions, I hope you were able to install TWRP on your Galaxy S8+ smartphone. As you are aware, we went over every step of the procedure, including preparation, bootloader unlocking, downloading the Odin or TWRP file, booting into download mode, and installing TWRP. If you have any further questions about this tutorial, please contact us. We will respond as soon as possible.