
The Samsung Galaxy Note 8 is a powerful smartphone. It has a vibrant 6.3-inch Quad HD+ super AMOLED display with 6GB RAM and powerful Qualcomm Snapdragon 835 processor. Most of this smartphone users wants to use it according to their wish. So, they asked me about how to root Samsung Galaxy Note 8 With or Without PC.
However, peoples also asking most of this relevant questions such as how to root my SM-N950F Note 8?, how can I root a Samsung Galaxy Note 8 without bricking it, is it safe to root Samsung Galaxy Note 8, Should I root my Samsung Note 8, which is the best and the safest way to root Samsung smartphone, can I upgrade Samsung Note 8 after rooting?
However, each of these questions needs a unique answer. In this blog article, we’ll discuss all of these problems along with step-by-step easy instructions on how to root your Samsung Note 8.
What is meant by Rooting? How can I root a Samsung Galaxy Note 8 without bricking it?
Rooting is the process of gaining administrative control over an Android subsystem. With this access, users can set up their mobile device in a way that gets over the limitations imposed by the manufacturer. You can install custom ROMs, get rid of bloatware, and more with a rooted phone.
However, rooting your Samsung Note 8 is a completely safe procedure if done perfectly. If you do it incorrectly, it could void the warranty and damage your phone. Therefore, if you want to root your Galaxy Note 8 without bricking it, then we share some tips that will help you soo.
- Understand the rooting process for your specific Samsung Note 8 model and Android version.
- Also use trusted sources and guides.
- Before rooting, back up all your important data to prevent data loss.
- Choose well-known rooting tools like Kingroot, Magisk Manager, CF-Auto Root/Odin3 and trusted methods.
- Only grant root access to apps and sources you trust. Avoid unnecessary modifications to system files.
- If you confused any modifications after rooting, we advised to ignore them.
Advantages of Rooting Samsung Note 8:
- Unlock hidden features of galaxy note 8 and customization options.
- Download and install root-only apps and mods.
- Improve battery life for maximum usage.
- Setting up Overclocking or Underclocking CPU.
- Boost your smartphone performance.
- Uninstall any pre-installed bloatware or system apps.
Disadvantages of Rooting Samsung Note 8:
- Void of any applicable warranties.
- The potential to brick the device if not done correctly.
- Issues with security if root access is not used carefully.
- System file modifications or overclocking may result in instability.
- Incompatibility with specific features or apps.
Which is the best and the safest way to root Samsung smartphone?
According to Kingroot-apk, the most often used rooting apps for Samsung-branded smartphones are Magisk Manager, SuperSU, Kingroot, iRoot, CF-Auto Root. These programs have successfully rooted numerous Samsung smartphones. You can easily root your Samsung Galaxy Note 8 Android 9 by selecting any of them and the following methods.
Therefore, remember that it may void your device warranty if done wrong. So, you should proceed at your own risk and with a thorough awareness of the possible drawbacks because rooting can damage your phone as well as security vulnerabilities and instability.
Read More: How to Root Samsung Galaxy S8 Plus
5 Important Things That You Should Keep In Mind Before Rooting:
Before you begin rooting your Samsung phone, there are a few things you should keep in mind to ensure a safe and smooth procedure. As you are understanding, rooting is a critical procedure. As a result, we’ll proceed carefully by the following through step by step.
Here are the following factors, you should know before root:
- Backup Your Data: Back up all your important data such as contacts, photos, videos, messages and any other files you want to keep.
- Charge Your Phone: Before beginning the process, make sure your Samsung Galaxy Note 8 has a sufficiently charged battery (preferably above 50%).
- Enable USB Debugging: Go to the device’s settings, navigate to “About phone,” and tap on “Software information.” Find the “Build number” and tap it multiple times until you see a message indicating that Developer Options are enabled. Go back to the main settings screen, and you should now see “Developer Options” or “System” in the menu. Enter Developer Options and enable “USB Debugging.”
- Install Required Drivers: You need USB drivers for your Samsung Galaxy Note 8 installed on your computer. You can usually find these drivers on the official Samsung website or through ADB Drivers or Fastboot.
- Read Guide: Read all the instructions and proceed with the caution.
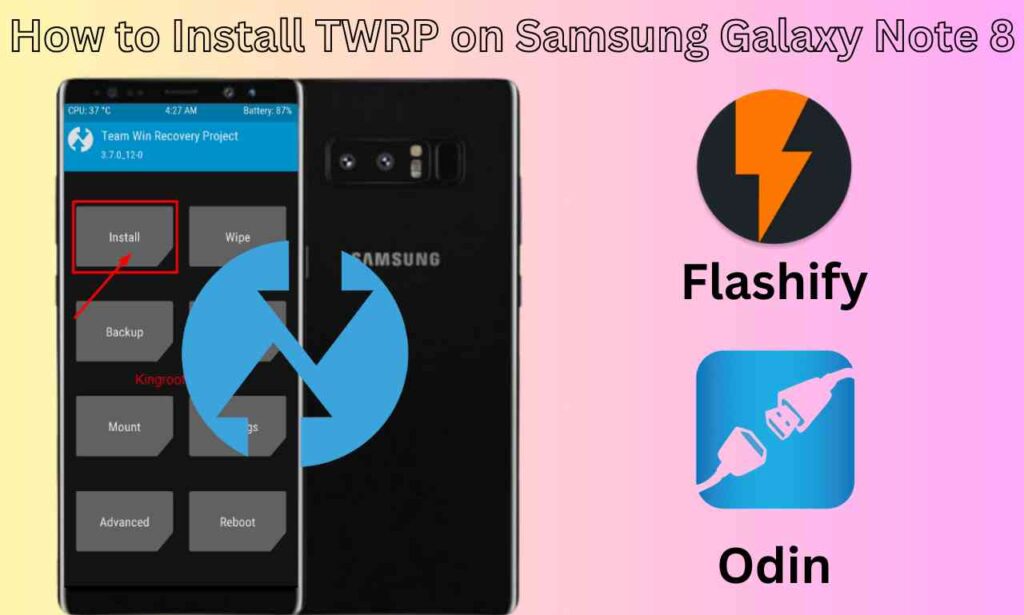
How to Root Samsung Galaxy Note 8 Without PC: Step By Step Guide
Rooting your smartphone allows you to customize and improve your smartphone experience. Before doing any type of task, be sure you know its benefits or losses. Rethink it if you still want to go on with it. Then, carefully read our instructions to ensure a safe and effective rooting process.
It is also important to note that you will be able to root any models of Samsung Galaxy Note 8 including Samsung Galaxy Note 8 (SM-n950, SM-n950f, SM-n950n) and others using these methods.
Also Read Useful Guides: How to Root Samsung Galaxy Note 10 Plus
Method#1: Root Samsung Note 8 Using Kingroot (Without PC/Laptop):

The most widely used one-click rooting tool is named “KingRoot.” Kingroot has successfully rooted tens of thousands of smartphones and tablets. This program allows you to root your device in 10 to 15 seconds if you’re looking for the quickest and simplest way of doing it.
However, the following instructions will show you how to root your Samsung Galaxy Note 8 phone using KingRoot:
Step#1: First step, you need to download “Kingroot” from here.
HERE: Download Link
Step#2: Make sure you have enabled “Developers Options” or “USB Debugging.” If not please enable these by follow our guides.
Step#3: Then locate your file in your ‘device manager or file manager’, after that click to install it.
Step#4: While proceeding it, you will receive prompt that (your this app tries to bypass android security protections).
Step#5: You must click on “More Detail” option to complete the installation.
Step#6: This will take few seconds to install.
Step#7: Once installed, come back to home screen.
Step#8: Open this app click on “Try It” to begin rooting process.
Step#9: Wait few moments to finish.
Step#10: Congratulations! your Samsung Note 8 smartphone has been rooted successfully.
Method#2: Root Samsung Note 8 Using Magisk Manager (With PC/Laptop):

The Magisk Manager is the most popular rooting application. It is a well-liked, free tool that offers a secure and responsive alternative to simpler ways. This app has also successfully rooted a lot of devices, 93% of the time. It is compatible with Android versions 3.0 and onwards, including 9.0.
A step-by-step guide for using Magisk to root your Samsung Galaxy Note 8 Without TWRP is provided below:
Step#1: Make sure that you have read the previously mentioned steps, such as data backup and USB debugging. If not enable, then read the above factors before starting this procedure.
Step#2: Download the “Maigsk Manager” from here. Then you need to enable “OEM Unlocking” option, simply go to——>”developer option” and check the OEM unlocking option to activate.

Step#3: So, in this method you need to unlock bootloader of Samsung galaxy note 8. Simply, power off your phone. Press and hold the Volume Up and Volume Down buttons. Connect your phone to your PC using the data cable. Once you see the bootloader warning screen, press and hold the Volume Up button to unlock the bootloader on your device. If this tricks not working, then read our complete guide.
Read Guide: How to Unlock Bootloader Without PC
Read More: How to Root Samsung Galaxy A14 Without PC
Step#4: After that you need to download “Stock Firmware“. simply open a any web browser and go to the official “Samsung firmware download page“. You can usually find it on the Samsung support website. On the firmware download page, enter your device’s model number, serial number, and region information.

Step#5: After entering the device details, the search results will display available firmware versions for your device. Select the one that matches your device. Click on the firmware version you want to download.
Samsung Support: Link
Step#6: After downloading the stock firmware for your Galaxy Note 8, you must extract it by using Winrar or Winzip.
Step#7: Then you need to patch the downloaded file using magisk app. Open the app and choose downloaded file. The AP firmware file will begin to be patched. You will notice a message stating that the AP firmware file has been patched once the patching is finished. You can find the patched file in the Downloads folder.

Step#8: In this step you need to boot Samsung Galaxy Note 8 into download mode. Shut off the phone simultaneously (holding down the Power button and the Volume Down button). Hold the buttons down until the bootloader warning screen appears. If the bootloader of your device has already been unlocked, simply press the volume up button once.
Step#9: After that download “Odin3” from official website. Run the Odin software on your computer.
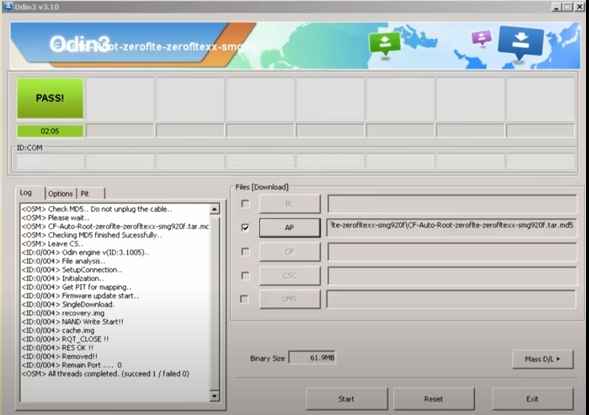
Step#10: Make sure you enter into download mode. Use a USB cable to connect your Samsung phone to your computer.
Step#11: Please carefully do this step, In Odin, click on the buttons for specific firmware files:
- Click the “AP” button and select the patched AP firmware file.
- Click the “BL” button and select the “Bootloader” firmware file.
- Click the “CP” button and select the “Modem” or “CP” firmware file.
- Click the “CSC” button and select the “CSC” firmware file.
Step#12: Ensure that the “Auto Reboot” and “F. Reset Time” options in Odin are checked.

Step#13: Once you’ve loaded the firmware files and confirmed the settings, click the “Start” button in Odin3.
Step#14: Your phone will start to be flashed with the modified AP firmware by Odin. Your phone will reboot throughout the process, which could take a few minutes.
Step#15: When the flashing is complete, Odin will display a “Pass” message in the green box.
Step#16: After that your phone will restart on its own. Give it time to finish booting up.
Step#17: If the patched firmware was properly applied, you should to have root access after your phone has booted up. You can confirm this by root checking app. You can download it easily from google play.
Note: Keep in mind that changing your phone firmware and rooting it carry certain risks and can void its warranty. Use the proper firmware for your individual phone model and carefully follow these instructions, and only continue if you are familiar with complicated technical tasks.
How to Check Your Root Access on a Samsung Galaxy Note 8?
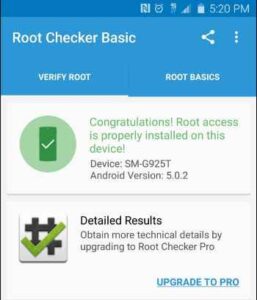
The easiest way to check if your device is rooted is by using a root checker app from the Google Play Store. Follow these steps:
- Open the Google Play Store on your device.
- Search for “Root Checker” and select a well-rated and trusted app. You can
- Download Root Checker by joeykrim from here.
Here: Google Play Store
- Install the app on your device.
- Open the Root Checker app and tap the “Verify Root” or similar button.
- The app will analyze your device’s root status and provide a message indicating whether your device is rooted or not.
If this prompt (that your device root access properly installed on this device) shown, then your Samsung Galaxy Note 8 has rooted successfully.
Is Rooting Safe For Samsung Galaxy Note 8?
Rooting is a safe process, if doing it well proper way. So, any Android device has benefits and reason able risks. To determine whether it is safe or not depends on how you consider it and how careful you are to doing.
As you know that rooting your Samsung mobile can typically void its warranty, failed to get OTA update, loss apps, security vulnerabilities and can damage your phone.
Final Words:
You are aware that rooting your Samsung Galaxy Note 8 is a simple process if followed above guides completely. So, you know it has more advantages as well as disadvantages, and you should be aware of them. So, we are not responsible for any loss.
However, if you are unclear or uneasy after rooting Samsung Galaxy A10s. Then, in order to retain security and warranty protection, we recommend that you unroot your phone. If you have any questions related to the available guides, please contact us.
FAQs:
Q1: Is it possible to unroot my Samsung Galaxy Note 8 if I change my mind?
Yes, you can generally unroot your device using programs such as SuperSU or Magisk, or by flashing the stock firmware via recovery. However, unrooting may void your phone warranty, and you must follow the precise instructions for your device model.
Q2: What are the risks of rooting my device?
There are several risks if done incorrectly such as it might result in vulnerabilities in security, a void warranty, and the possibility of “bricking” the device. Additionally, there is a chance that it will terminate several app and service warranties.
Q3: Can I use banking apps or Google Pay on a rooted Samsung device?
It can be difficult to use banking apps on a rooted Samsung mobile. Some banking apps and services like Google Pay may not work on rooted devices due to security concerns. Many banking apps utilize security techniques to detect rooted devices or changed system software.