
Hey everyone, if you have a Samsung Galaxy S10 Plus and want to install TWRP recovery, this is the guide for you. The first question that comes to mind is how to Install TWRP on Samsung S10 Plus. So if you’re ready to take your phone to the next level, simply follow the instructions in this post.
Recently, I’ve received many questions such as what is TWRP or why is it used?, how can we install team recovery project (TWRP) on Samsung S10 Plus, is it safe to boot my smartphone and install twrp, is root required to install TWRP recovery, how do I fix a bootloop caused after restoring a TWRP backup, how can I recover a phone stuck in the TWRP Recovery mode boot loop after a hard reset, how can I resolve bootloop after exiting TWRP, how can I check if TWRP flashing worked?
In this blog article, I will answer these questions and show you how to install it step by step. So, take more attention to these.
What is TWRP? Why is it used?
TWRP (Team Win Recovery Project) is the most popular custom recovery tool that has an intuitive and touch-based interface. It allows users to flash third party zip file to perform various tasks such as installing custom ROMs, making backups, enhancing performance, flashing mods and more. Unlike the stock recovery, TWRP offers more features and flexibility in customizing your Android experience.
However, it was created as a more advanced alternative to stock recovery image. It has a graphical user interface, file browsing, ability to flash zip files, modify build.prop files and more. TWRP supports a wide range of Android devices from various brands like Google, Samsung, OnePlus, Xiaomi, etc.
Because it has regularly up-to-date by developers in order to offer new features and support future devices. It is considered the gold standard for customs recovery. So, you can download it for your Galaxy S10 Plus from our site.
Benefits of installing TWRP on Samsung Galaxy S10 Plus?
Installing TWRP on the Samsung S10 Plus unlocks the following hidden features:
- It allows users to create complete backup easily.
- Users can easily install custom ROMs, custom kernels and mods.
- You can easily root and unroot by flashing SuperSU, Magisk .zip files without using computer.
- It can boost your smartphone performance by setting up overclock or underclocking.
- It allows installing themes, mods and tweaks through custom zips that require root/recovery access.
- Users can remove bloatware such as pre-installed apps.
- By using it, you can clean data, clear system cache, fixing permissions and managing system files easily.
- You can change the build.prop file, which contains device settings for overclocking, toggling flags and more.
Drawbacks of Installing TWRP on Samsung Galaxy S10 Plus:
While installing TWRP Recovery on the Samsung S10 Plus has a number of advantages, it is essential to look into its risks. Here are some disadvantages:
- Installing TWRP is a risky process that can damage your phone.
- Your Samsung S10 Plus warranty will be void if something goes wrong.
- You can’t receive OTA updates from Samsung.
- Can’t use banking apps.
How to Install TWRP on Samsung S10 Plus: A Comprehensive Guide
There are two versions of TWRP, the official version and the beta version. Both are simple and secure. Remember that, you couldn’t install TWRP without using computer. This guide only works on galaxy s10 plus, don’t try it another. Before performing this process, remember to backup all essential data to ensure that everything goes according to plan.
What should I do before installing TWRP on Galaxy S10 Plus?
The following steps should be taken to have your smartphone ready before installing TWRP.
- Make a comprehensive backup of all of your essential data, including contacts, files, movies and photographs before making any modifications.
- Your Galaxy S10 Plus should be charged to a minimum of 50% or more.
- One of the most important step is to unlock your device bootloader. If you don’t know about to unlock bootloader then read our guidelines.
Read Guidelines: How to Unlock Bootloader without PC?
- This procedure requires the use of a PC and a USB cable.
- Make sure that you have enable “Developer Option” or “OEM Unlock” option. If not, then go to System Settings > About Phone > Build Number, tap build number for multiple times until the message appear developer option enabled. After that come back to settings and click on developer options and tap on OEM Unlock option to enable it. Doing this step also helps you to unlock your device bootloader.
- Must sync all accounts like Samsung accounts and Google accounts then remove it.
- Odin required to complete that task. As a result, you must download and install it on your computer or laptop.
- Before beginning any process, read and carefully follow these guidelines.
Installing TWRP on Samsung S10 Plus With Odin:
Remember that Samsung has two different kinds of models for most of their expensive phones. Also the region based have a different sort of variants to the same model. It means Samsung Galaxy S10 plus can be Galaxy S10 plus with a different model number in Europe than in Asia or in some other place. So, you need to make sure that what is your Samsung model number for downloading right TWRP file.
The procedure is straightforward, if you are a newbie with no technical understanding. Before beginning this guide, please ensure that you have read all of the above instructions. This tutorial should not work properly if any steps are missed.
Step#1: To begin, we must download TWRP for our individual Samsung S10 Plus model. Simply, go to Google and search search your model number like SM-G975f and give a space and then write TWRP or other custom recovery. For instance you see the model and processor that your phone have. Click on official site as shown in image.

Step#2: In this page, you need to find download links as shown in image. There are two links, you can click any of these and then you will see one is “.image” file and other is “.image.tor” file and size is almost same. So, I recommends you to download “.image.tor” file because this is what you need in case of Samsung phones.
Step#3: Now you have downloaded TWRP tar file, move it to your computer. Then make sure that you have downloaded Odin tool and open it in your Pc.
Step#4: After that, you need to go to the download mode. Firstly, turn off your Samsung Galaxy S10 plus. Once your phone goes to switch off mode then press on (bixby+volume down+power) buttons at the same time and hold all these three until you will not see warning screen. Now to continue you have to press “volume up” button once and again press for yes. You see the download screen which we need.

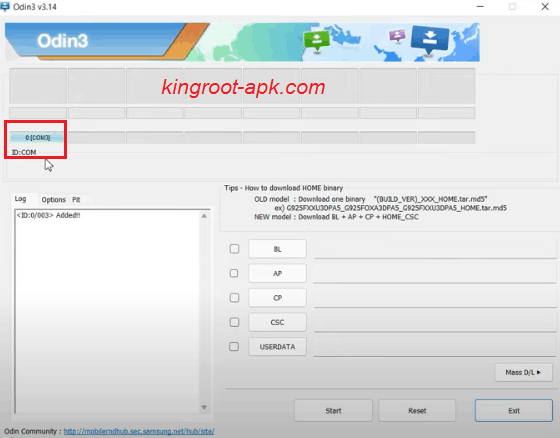
Step#5: Open Odin program on your computer. You need to connect your Galaxy S10 plus to Computer via USB Cable that is generally type c. Once it connected, you see this COM as shown in image. It means that your phone has been detected.
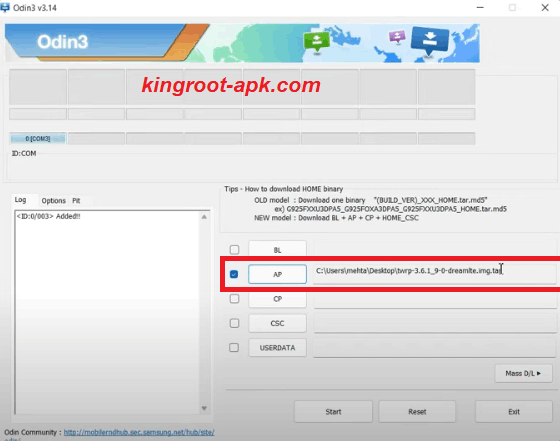
Step#6: In this step, you see all slots such as “BL, AP, CP, CSC, UserData“. You need to click on “AP” to choose TWRP tar file that you have just downloaded or move into you computer. Tap to open, it might take some time or depending on how heavy that file.
Step#7: Make sure you have disable Auto Reboot in option as shown in picture. If not then uncheck the “Auto Reboot” button.
Step#8: Click on “Start” button. It will take some time to complete.

Step#9: Once complete, you will see pass as shown in image. It means that the recovery has been successfully flashed.

Step#10: Now, you need to boot into recovery mode. Firstly get out from download mode. So, press “Volume Down” key and power button for 7 seconds.
Step#11: During this moment’s your Samsung Galaxy S10 plus is about to boot up. So, you can start the combination of recovery by pressing (Bixby+Volum Up+Power) button quickly and holding these combinations until recovery page not open. If you fail to boot it on time then you phone will boot up. You can try again right after switch off your device.

Step#12: Once recovery page open. You can swipe to allow system modification. So, in this way you can install TWRP on Samsung S10 Plus easily. If you want to root it and don’t know how, then you can learn more about from our guidelines.
Read More: How to Root Samsung Galaxy S10 Plus?
Is it safe to boot my smartphone and install TWRP?
Booting your smartphone into recovery mode and installing (Team Win Recovery Project) TWRP is generally safe if following the right procedure to do it. Before doing any procedure, it’s important to backup of your important data and and do a proper research. Carefully read and double check instructions before attempting.
Final Words:
By following these steps, hope you have successfully installed TWRP on Samsung Galaxy S10 plus. Ensure that your smartphone is running the latest up to date version provided by Samsung. Some TWRP installations may require specific firmware versions for compatibility. If you confused about these steps and stuck in problem then you can ask us now. We will response you as soon as possible.
FAQ’s:
Q1: Is root required to install TWRP recovery?
For installation of TWRP, it doesn’t need to root your device. The only thing that you needs to unlock bootloader of your smartphone. With TWRP recovery, you can install custom ROM, flashing zip files or even root and unroot your smartphone by flashing SuperSU zip files without using computer.
Q2: How do I fix a bootloop caused after restoring a TWRP backup?
You can fix a bootloop by the following:
- Reboot your device into recovery mode.
- Wipe Cache/Dalvik Cache.
- Re-flash custom ROM or Stock Firmware.
- Restore from different backup.
- Make sure that your have installed correct TWRP tar file or you can try different.
- After performing these tasks, attempt to reboot your phone.
Q3: How can I recover a phone stuck in the TWRP Recovery mode boot loop after a hard reset?
If you perform a hard reset, there are a few things you can try to get your device back up and running.
- Go to the TWRP recovery mode menu and select restore to recover your phone.
- Go to the TWRP recovery mode menu and select Wipe > Factory Reset to erase all data. It helps to recover your phone.
- You can use ADB to flash a new recovery image to your device, which may help resolve the boot loop issue.
- If none of the above steps work, you may need to contact from official TWRP site.
Q4: How can I check if TWRP flashing worked?
To check it, you can boot your device into recovery mode. Firstly, switch off your phone and pressing (Bixby+volum up+powerful) at the same time until you will not see twrp page. In the TWRP “Install” section, attempt to flash a small ZIP file, such as a custom kernel or mod.